How to Set Up Mail for Mac OS X for the First Time
You will need your email server settings to set up your email program. They will have been given to you when you set up your account with your domain.
First, open Mail.
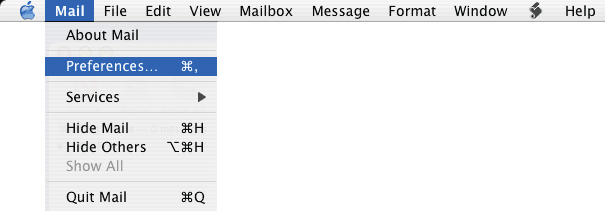
Once you’ve opened Mail, click on the menu labeled “Mail,” and select “Preferences.”
The Welcome to Mail dialog box will appear
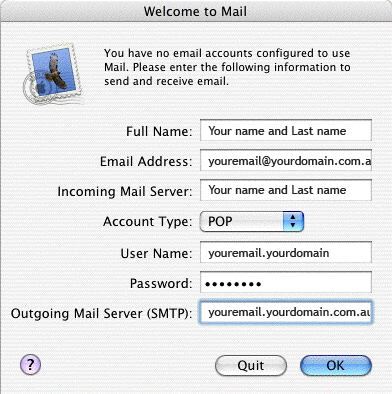
In the Full Name field, type your name.
In the Email Address field, type your full domain email address.
In the Incoming mail server field, type in mail.yourdomain.com
Click the arrow box on the Account Type pop-up list and choose POP.
In the User Name field, type your username.yourdomain. Be sure to include .yourdomain. Although this is not typical, it is required for the domain mail server.
In the Password field, type your domain password.
In the Outgoing Mail Server (SMTP) field, type in mail.yourdomain.com.
Click the OK button.
At this point, Mail will attempt to contact the mail server. If it fails, click the Continue button on the warning message that appears to continue with the set up.
Click the No button, unless you want to import email from another mail program.
The Welcome dialog box will appear

Click the No button.
How to Set Up Mail for Mac OS X.3 to Send and Receive Email
You will need your email server settings to set up your email program. Please click here and enter your email address. Print or write down the information that is displayed for use during this walk through.
Open Mail.

Once you’ve opened Mail, click on the menu labeled “Mail,” and select “Preferences.”

Make sure you have the Accounts Icon selected. You’re presented with a window which contains three tabs, “Account Information, “Special Mailboxes,” and “Advanced.” First, let’s look at the “Account Information” tab.
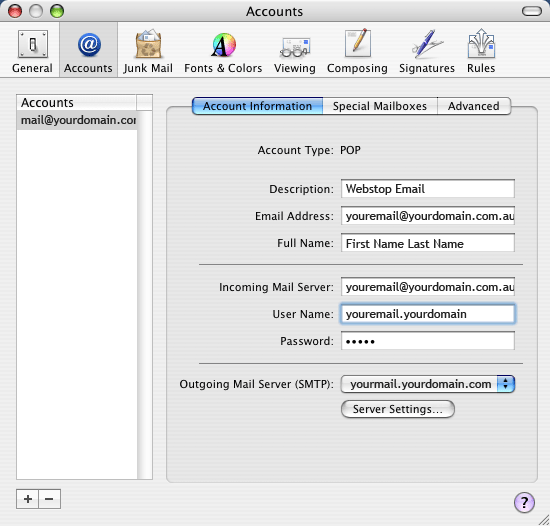
The Account type was determined when you set up the account. You cannot change it unless you delete this account and create a new one. The account type is POP.
Description can be whatever you like, but it is recommended that you use something descriptive.
Email Address should be your domain email address.
Full Name can be your name, or whatever text you’d like to be seen as your name when you send email.
Incoming Mail Server should be mail.yourdomain.com
“User Name” should be your username.yourdomain (Make sure to include the .yourdomain) Although this is not typical, it is required for the domain mail server.
Password is the password for your domain login name
Outgoing Mail Server
You can edit the Outgoing Mail Server by pressing the “Server Settings” button.
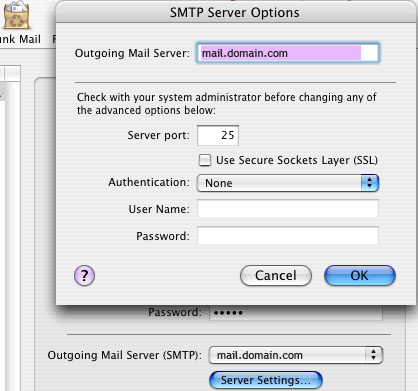
The Outgoing Mail Server should be mail.yourdomain.com
The “Server port” should be 25
Leave Authentication at None.
Next, there are the Special Mailboxes
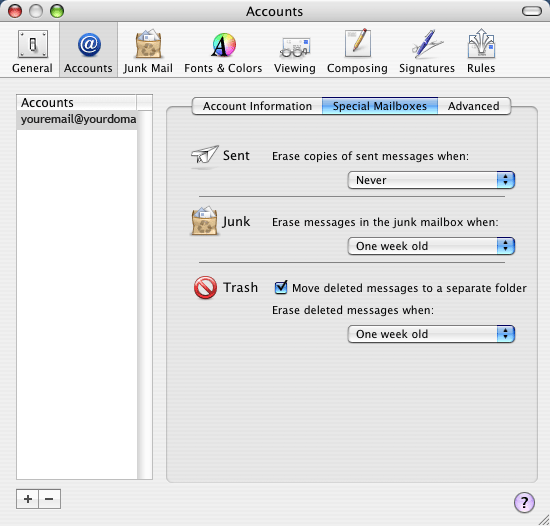
Set these three choices up according to your own preferences. They can all be left at Never if you want.
Last, please take a look at the Advanced options.
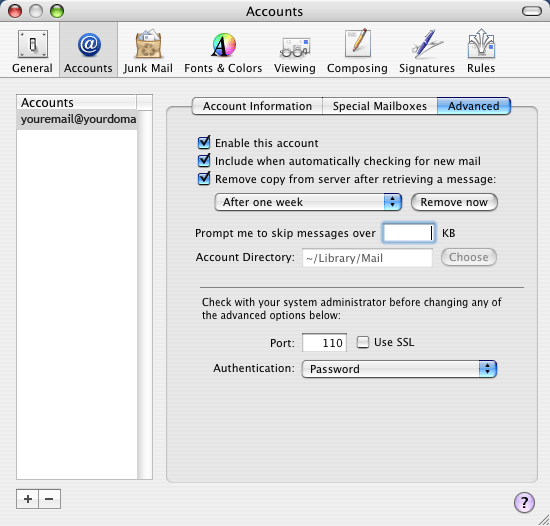
Enable this account means that you will be able to send and receive mail from this group of mail settings.
Include this account when automatically checking for new mail, keep that checked.
Remove copy from server after retrieving a message means that Mail will delete every message you download from mail.yourdomain.com after it’s been downloaded, and after the time specified by the pull down menu just below that checkbox. We have set our OS X Mail program to delete the messages after one week.
You can use the “Remove now” button to delete any old mail on the server that’s sitting there right now, if you wish.
Prompt me to skip messages over [ ] KB will let you tell Mail to not download messages larger than a certain size. Most people just leave this off. This will tell Mail to not download any particular message exceeding a certain file size. If you don’t want to use it, leave the field blank.
If you’re using SSL, the default port will be 995. If you’re not using SSL, the port should be 110.
Authentication should be set to “Password.”
For more information about the behavior of each of these advanced options, click on the “?” button in the lower-right corner of this window.
That’s it! Press OK and close the account window. You are ready to use Mail for OS X.